
Workflows & Automations
Go High Level is an all-in-one CRM and marketing platform designed to help businesses and agencies streamline their sales and marketing. It combines tools for lead generation, email & SMS marketing, sales funnels, appointment scheduling, customer relationship management (CRM) and more into one unified system. Instead of juggling multiple apps, Go High Level provides everything under one roof, which can save time and reduce complexity for small business owners and marketing professionals.
One of Go High Level’s most powerful features is its automation engine, known as Workflows. This allows you to automate repetitive tasks and marketing processes – such as sending follow-up messages, updating records, or scheduling reminders – so you can focus on what matters most. In this article, we’ll explore exactly what workflows and automations are in Go High Level, why they matter, and how you can use them to grow your business.
What Are Workflows & Automations in Go High Level?
In Go High Level, Workflows are essentially automated sequences of steps (tasks) that run on their own once started. You define a series of actions – like sending an email, adding a tag to a contact, or waiting a few days – and those actions will execute whenever the workflow is triggered. In simple terms, a workflow automates a process you would otherwise have to do manually. Set it up once, and it keeps working in the background, day or night.
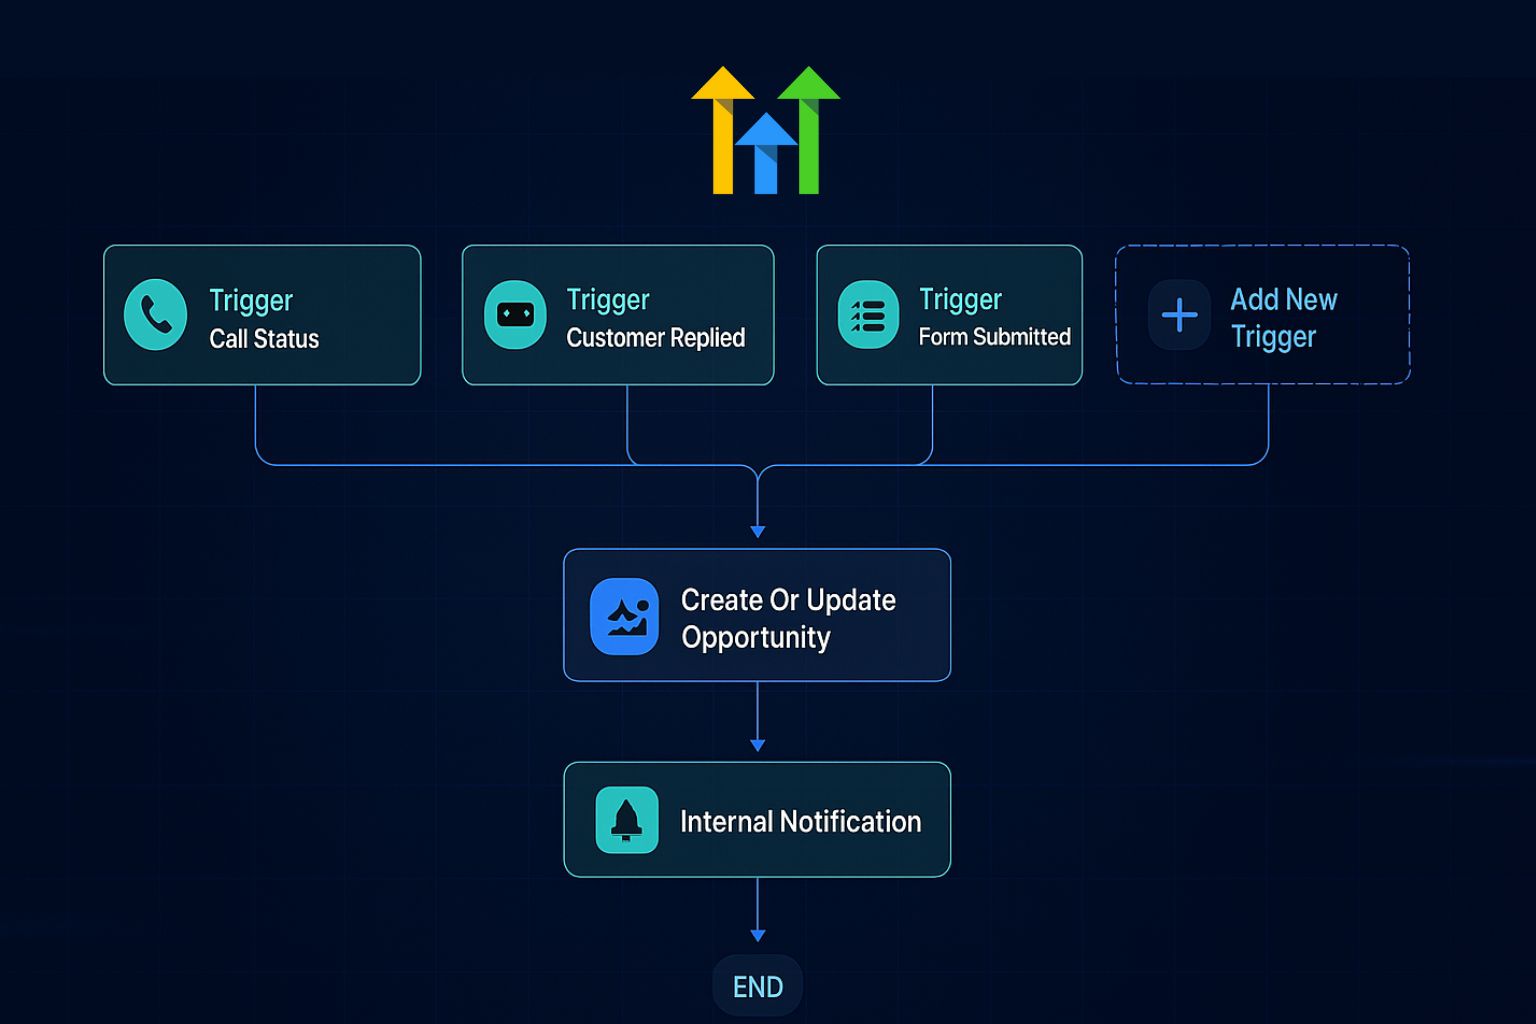
The term Automations in Go High Level refers broadly to letting the system handle tasks automatically. A workflow is the specific tool (the workflow builder) inside Go High Level where you create these automations. Each workflow begins with a Trigger (an event that kicks it off) and contains one or more Actions (the tasks to perform). You can also incorporate logic like conditions (if/else branches) to make the automation “smart” – for example, doing one thing if a contact is a new lead versus a different path if they’re an existing client.
To illustrate, imagine someone fills out a contact form on your website. You could have a workflow that automatically:
- Adds the new contact into your CRM,
- Sends them a welcome email immediately,
- Waits 1 day and then sends an SMS follow-up,
- Notifies you or your team about the new lead,
- Applies a “New Lead” tag for segmentation.
All of that can happen automatically in sequence, thanks to a workflow. In short, workflows and automations in Go High Level act like an autopilot for your business tasks – once configured, they carry out repetitive processes reliably without you having to push a button every time.
Why Automations Matter
Automating your processes can be a game-changer for efficiency and growth. Why spend hours on manual follow-ups or data entry when software can do it for you? Here are some key benefits of using automations in Go High Level:
-
Time Savings: Repetitive tasks (like sending appointment reminders or follow-up emails) happen automatically, freeing you to focus on higher-value work like engaging leads or serving customers.
-
Consistency: Humans might forget or make mistakes – automations don’t. Every new lead gets the proper welcome message, every appointment receives a reminder, every client follow-up happens on schedule. This consistent execution builds reliability into your business.
-
Improved Lead Nurturing: Automated follow-ups ensure no prospective customer slips through the cracks. You can nurture leads with timely information and touches (emails, texts, etc.), which increases the chances of converting them into customers.
-
Better Customer Experience: Customers appreciate prompt, helpful communications. A well-timed welcome message or appointment reminder shows professionalism and makes them feel valued.
In fact, studies have found that businesses implementing marketing automation see significant improvements in efficiency. For example, 61% of small businesses report increased efficiency and productivity after implementing marketing automation tactics. The bottom line: automations let you do more with less effort – a big advantage for any busy entrepreneur or marketing team.
Key Terminology Explained
Before diving deeper, let’s clarify some key terms you’ll encounter in Go High Level’s automation system:
-
Workflow: An automated sequence of steps or tasks executed in a specific order. The workflow is the container that holds your entire automation (triggers, actions, conditions, etc.). You set it up once, and it runs automatically whenever its trigger event occurs.
-
Trigger: The event that starts a workflow. When a trigger’s conditions are met, the workflow kicks off. For example, a new contact being added, a form being submitted, or an appointment being booked can all serve as triggers. (Think of the trigger as the “IF this happens…” part of an automation.)
-
Action: A step that the workflow performs after being triggered. This could be sending an email, creating a task, adding a tag to a contact, waiting for a period of time, and so on. (Actions are the “then do that…” steps in the workflow’s logic.)
-
Condition (If/Else): A logic step that allows the workflow to branch into different paths. In Go High Level, an If/Else condition lets you say, “If the contact meets Condition X, do Path A; otherwise, do Path B.” For instance, “If contact has VIP tag, assign to senior rep; else assign to normal queue.”
-
Trigger Filters: Optional criteria to narrow down a trigger. For example, you can set a “Contact Tag” trigger to run only when the tag added = “Hot Lead” (ignoring other tags). Filters help ensure a workflow runs only for specific sub-events you care about.
These terms might sound a bit technical at first, but they’re fairly straightforward. In summary: a trigger gets things started, actions are what happen, and conditions/filters customize the path. With these basics in mind, let’s look at some real examples of how you can use workflows in Go High Level.
Common Use Cases for Workflows
Workflows in Go High Level are extremely flexible. You can automate just about any repeatable process where you want a timely, consistent outcome. Here are some real-world examples of how businesses use workflows and automations across different scenarios:
Lead Nurturing Sequences
Automatically follow up with new leads so they stay engaged. For example, when a new lead comes in (say via a form on your website or a landing page), a workflow can send a series of communications: an immediate welcome email, a follow-up email with more info after a day or two, perhaps an SMS check-in a few days later, and so on. This kind of workflow warms up prospects without you manually sending each message.
Appointment Reminders and Confirmations.
For any appointment-based business (doctors, salons, consultants, etc.), workflows shine at sending reminders and confirmations. The moment a client books an appointment on your calendar, you can trigger a workflow that sends a confirmation email or text, then a reminder 24 hours before the appointment, another reminder 1 hour before, and even a follow-up thank-you message afterward. This reduces no-shows and improves the client experience without you lifting a finger.
New Customer Onboarding
When someone becomes a customer or client, an onboarding workflow ensures they get all the information they need. For example, once a deal is marked as “Won” in your pipeline (or a payment is received), you could trigger a series of actions: send a welcome email with next steps, create a task for a team member to schedule a kickoff call, and deliver any starter resources or account credentials. Every new client will then receive a consistent, thorough welcome without you having to remember to send it.
Customer Feedback & Review Requests
After you deliver a product or service, you likely want to gather feedback or reviews. A workflow can automate that process. For instance, 2 days after a service is completed (trigger: appointment status marked “Completed”), automatically email the customer a brief satisfaction survey or a link to leave a review on Google/Facebook. If the customer doesn’t respond, the workflow might send a polite reminder a few days later. By automating feedback requests, you consistently collect testimonials and address any issues promptly.
These are just a few popular use cases. Other uses include abandoned cart recovery for e-commerce (sending a follow-up if someone leaves items in their cart), event/webinar follow-ups (reminders and post-event emails), lead scoring and segmentation (automatically scoring leads or tagging them based on behavior), internal notifications (alerting your team or assigning tasks automatically), and much more. If a process is repetitive and has a clear trigger point, chances are you can automate it with a Go High Level workflow.
How to Create a Workflow (Step by Step).
Now that we’ve covered the what and why, let’s get hands-on with how to build a workflow in Go High Level. The platform provides an intuitive visual Workflow Builder to design your automations. You don’t need any coding – you’ll be selecting triggers, actions, and settings through the interface.
Follow these general steps to create a basic workflow:
-
Navigate to the Workflows section: Log in to your Go High Level dashboard and go to Automations → Workflows. Here you’ll see a list of any existing workflows (if you have none yet, the list will be empty). Click the “Create Workflow” button to start a new one.
-
Choose a Template or Start from Scratch: Go High Level will ask if you want to start from scratch or use a recipe (pre-built template). For beginners, using a recipe template can be very helpful – HighLevel provides ready-made workflow “recipes” for common use cases (like basic lead nurture, appointment reminders, etc.). You can also choose to import steps from an existing campaign (if you used the older campaign system). Otherwise, select “Start from scratch.”
-
Set Your Trigger: Once in the Workflow Builder, the first step is to add a Trigger (the event that will put a contact into this workflow). Click “Add New Workflow Trigger.” You’ll see a menu of trigger options (we’ll cover trigger types in detail in the next section). Select the trigger that makes sense for your workflow. For example, if you’re creating a welcome sequence for new leads, you might choose Contact Created or Form Submitted as the trigger. If it’s an appointment reminder workflow, you’d pick an appointment-related trigger. Configure any specifics for the trigger (the system will prompt you with relevant options).
-
Add Trigger Filters (if needed): After choosing a trigger, you have the option to narrow it down with filters. This step is optional but useful. For instance, if your trigger is “Contact Tag added”, you might add a filter to only run the workflow when the tag equals “Hot Lead” (ignoring other tags). Or if the trigger is “Appointment booked”, you could filter by a specific calendar or appointment type. Filters ensure the workflow runs only for the exact scenario you intend.
-
Define the Actions (the workflow steps): Next, start adding your Actions – the things you want to happen in sequence once the trigger fires. Click “Add Action.” You’ll see a list of possible actions (send email, SMS, add tag, wait, etc.). Select an action and fill in its details. For example, add a Send Email step to deliver a welcome email, then a Wait step for 1 day, then a Send SMS to text them afterward. Stack as many actions as needed in the order you want them to execute.
-
Incorporate Conditions or Branching (if applicable): If your process can go in different directions, you can use an If/Else condition action to branch the workflow. For example, you might say: “If the contact has already responded (or has a certain tag), then skip the rest of this sequence; else continue with the next follow-up.” To add a condition, select the If/Else action and define the rule (e.g., check if a field or tag has a certain value). The workflow will branch into a ‘Yes’ path when the condition is met, or a ‘No’ path when it isn’t. You can then add different actions under each path.
-
Review Settings: Before activating your workflow, click on the Settings tab in the builder. Here you can give the workflow a descriptive name (e.g., “New Lead Welcome Series”), and adjust advanced options like allowing contacts to enter the workflow multiple times or whether the workflow should stop if the contact replies to a message (often used in marketing sequences to avoid over-communication). For most simple workflows, the defaults are fine, but it’s good to know these options exist.
-
Test and Activate: Before putting a workflow into use, always test it. Go High Level’s Test Workflow tool lets you simulate the automation (for example, add a test contact to trigger the workflow and watch the actions run). Use it to verify that emails/texts send correctly and the logic flows as expected (check the workflow’s History for a play-by-play). Once you’re satisfied, switch the workflow from Draft to Published mode to turn it live. Your automation will then run whenever its trigger conditions are met.
That’s it! You’ve created a workflow. You can always come back and edit or add steps as needed. As you build confidence, you can create more complex workflows or multiple workflows to handle different parts of your business. Remember to monitor your active workflows (the History and Status tabs in the builder will show you which contacts are in the workflow and what actions have executed) and tweak them if needed.
Triggers in Detail (Types of Triggers)
Triggers are events that tell the system “start this automation now.” HighLevel provides triggers for almost any event in your business. The main types include:
-
Contact Triggers: Fire when something happens with a contact’s record. Examples: a new contact is created, a tag is added to a contact, a contact’s info is updated, it’s the contact’s birthday, or a contact opts out (DND status enabled). Here is the complete list:
-
- Birthday reminder (Runs on customer’s birthday)
- Contact Changed (Runs when a contact data is updated)
- Contact Created (Runs only when a new contact is created)
- Contact DND (Runs when a contact’s DND flag is enabled)
- Contact Tag (Runs when tags are added or removed)
- Custom Date reminder (Runs on custom date)
- Note Added (Runs when a note is added to a contact)
- Note Changed (Runs when a note is updated)
- Task Added (Runs when a task is added to a contact)
- Task Reminder (Remids task due)
- Task Completed (Task completed trigger)
- Contact Engagement Score (Runs this trigger to initiate workflow when a contact’s engagement score meets a specific condition)
- EventsTriggers: Fire when someone submits a form or survey. Examples: a form on your website or funnel is submitted, a survey is completed, or even a Facebook/Instagram Lead Ad form is submitted (via integration). Here is the complete list:
-
- Inbound Webhook (Runs when a request is sent to the Hook URL Provided)
- Call Status (Runs on onbound and inbound calls)
- Email Events (Runs on specific email events)
- Customer replied (Runs when an incoming message is received from a contact)
- Form submitted (Runs when a form is submitted)
- Survey submitted (Runs when a survey is submitted)
- Trigger Link Clicked (Runs when your trigger link is clicked)
- Facebook lead form submitted (Runs when the lead submits your facebook form)
- TikTok Form Submitted (Runs when a Tiktok lead form is submitted)
- Video Tracking (Runs when a lead watches up to a specified percentage of the video)
- Number Validation ( Triggered based on the Number Validation feature (if enabled) and checks whether the contact number is landline or invalid before sending the first message)
- Messaging Error – SMS ( Triggered based on the error received for an undelivered message. This can be used for taking relevant measures to clean the contact list eventually improving the delivery rate.)
- LinkedIn Lead Form Submitted (LinkedIn Lead Form Submitted Trigger.)
- Funnel/Website PageView (Runs when a contact has viewed a page)
- Quiz Submitted (Runs when a quiz is submitted.)
- New Review Received (This trigger allows you to create automated actions when new reviews come in from Facebook or Google. You can filter these reviews based on various criteria to customise your workflow. This trigger is contactless, meaning the reviews are not linked to any specific contact.)
- Prospect Generated (This trigger allows you to create automated actions when new prospects are received. You can filter these prospects based on various criteria to customize your workflow. The trigger will only be executed once web report links are generated successfully after the prospect has been received and the filters have been matched.)
-
Appointment Triggers: Fire for calendar events. Examples: an appointment is booked/scheduled on your calendar, or an appointment’s status changes (e.g., confirmed, canceled, no-show).
- Appointment Status (Runs on all appointment status updates)
- Customer Booked Appointment (Runs when a customer books an appointment).
- Pipeline (CRM) Triggers: Fire when deals (opportunities) change in your pipeline. Examples: a new opportunity is added to a sales pipeline, an existing deal moves to a different stage, or a deal is marked as “Won” or “Lost.”
-
- Opportunity status changed (Runs when the opportunity gets changed)
- Opportunity created (Runs when the opportunity gets created)
- Opportunity changed (Runs when the opportunity status gets changed)
- Pipeline stage changed (The pipeline stage was updated for an opportunity.)
- Stale Opportunities (Runs when opportunities older than the given time duration)
-
Affiliate Triggers: Fire based on affiliate-related actions within your affiliate management system. Examples: when a new affiliate signs up, an affiliate achieves a specific commission milestone, or a payout is triggered to an affiliate partner.
- Affiliate Created (Runs when a New Affiliate is Created)
- Affiliate enrolled in campaign (Runs when a Affiliate will be added in the campaign)
- New Affiliate Sales (Runs when a new sales transaction is recorded for an affiliate.)
- Courses Triggers: Fire based on interactions with your online courses or membership products. Examples: when a student enrolls in a course, completes a specific lesson, reaches a course milestone, or when a user abandons a course without completion.
- Category Started (Runs when a category of specified product starts )
- Category Completed ( Runs when a category of specified product gets completed )
- Lesson Started ( Runs when lesson starts )
- Lesson completed ( Runs when lesson gets completed )
- New Signup ( A customer / lead subscribed for a course )
- Offer Access Granted ( Runs when access to offer is granted )
- Offer Access Removed (Runs when access to offer is removed )
- Product Access Granted (Runs when access to product is granted )
- Product Access Removed ( Runs when access to product is removed )
- Product Started ( Runs when product starts )
- Product Completed ( Runs when product gets completed )
- User Login (Runs when user logs in a course )
- Payments Triggers: Fire when financial transactions occur. Examples: when a payment is successfully processed, an invoice is paid, a subscription payment fails, or when a payment method is updated or declined.
- Invoice ( Runs when an Invoice is created or updated )
- Payment Received ( Runs when a payment is received )
- Order Form Submission (Runs when an Order Form is submitted )
- Order Submitted ( Runs when an Order is submitted )
- Documents & Contracts
- Estimates ( Estimates Trigger , Status, Value )
- Subscription ( Runs when a new subscription is created or subscription status changes )
- Refund ( Runs when a refund is initiated for a transaction )
- Shopify Triggers: Fire based on interactions in your integrated Shopify store. Examples: when a new order is placed, an order status is updated, a product is purchased, abandoned cart events occur, or a customer account is created or updated in Shopify.
- Abandoned Checkout ( Runs when the leads (shoppers) does not complete the checkout )
- Order Placed ( Runs when the leads (shoppers) place an order )
- Order Fulfilled ( Runs when the order is fulfilled by the store, after the lead has already placed the order )
- IVR Triggers: Fire based on Interactive Voice Response (IVR) interactions within your call tracking or virtual phone system. Examples: when a customer selects a specific menu option, completes a call through IVR, or leaves a voicemail message via the IVR system.
- Start IVR Trigger (A phone system subscription is required to proceed with the IVR trigger. )
- Facebook/Instagram Events Triggers: Fire based on events generated by interactions from Facebook or Instagram. Examples: when a contact registers for an event through Facebook or Instagram, responds positively to event invitations, or engages with event-related posts or advertisements.
- Facebook – Comment(s) on a Post by default applicable to all posts, if nothing is selected.
- Instagram – Comment(s) on a Post by default applicable to all posts, if nothing is selected.
- Communities Triggers: Fire based on interactions within community platforms or group management tools integrated with Go High Level. Examples: when a user joins a community group, participates actively, reaches a certain engagement milestone, or leaves the community.
-
- Group Access Granted ( Community Group Access Granted trigger )
- Group Access Revoked (Triggers when a contact’s access is revoked from community group’s private channel)
- Private Channel Access Granted ( Triggers when a contact is granted access to community group’s private channel )
- Private Channel Access Revoked (Community Private Channel Access Revoked trigger )
- Community Group Member Leaderboard Level Changed ( This trigger enables you to create automated actions when a community group member’s gamification level changes.)
In practice, you will choose a trigger based on what event should kick off your workflow. For instance, use a Contact Created trigger to start a welcome drip for new leads, or an Appointment Scheduled trigger to start your reminder sequence. Simply pick the trigger that matches your scenario, and the workflow will “listen” for that event to occur.
List of Workflow Actions (and What They Do).
After a workflow is triggered, it carries out a series of Actions. An action is a task the system performs (sending a message, updating a record, etc.). Go High Level offers many types of actions, including:
-
Contact Management Actions: Automatically manage your contacts and CRM data. For example, create or update contact records, assign a contact to a specific team member, add or remove contact tags for segmentation, add internal notes or create follow-up tasks, adjust a contact’s Do-Not-Disturb status or lead score, or even delete a contact. (In short, virtually anything you might do manually in the CRM can be done by a workflow action.) Here is the full list:
- Create Contact (Automatically creates new contacts or updates existing ones)
- Find Contact (Find a Contact with the matching values)
- Update contact field (Update a field in the contact record)
- Add Contact Tag (Adds specified tags to the contact)
- Remove Contact Tag (Removes specified tags from the contact)
- Assign to user (Assigns the contact to a user. Specify the user or add multiple for round-robin assignment)
- Remove Assigned User (Removes any assigned users leaving the contact unassigned)
- Enable/Disable DND (Activate do-not-disturb for the contact )
- Add to notes ( Adds a Note to the Contact Record)
- Copy Contact (Copy contact to another account)
- Edit Conversation ( Mark the Conversation as Read/Unread and Archive/Unarchive it)
- Add Task ( Create a new Task with a defined Due Date to be Assigned to a Specific User )
- Delete Contact ( This action permanently deletes the contact from this account and all workflows. )
- Modify Contact Engagement Score ( Use this action to modify a contact’s engagement score based on triggers )
- Add Contact Followers ( Adds the specified users as followers to the contact. )
- Remove Contact Followers ( Removes all or the specified users as followers from the contact. )
-
Communication Actions: Automate outreach and messages across channels. You can send an email to the contact (using a template or custom content), send an SMS text to their phone, initiate a phone call or drop a pre-recorded voicemail, send a Facebook Messenger message or Instagram DM (if the contact came through those channels), send a WhatsApp message (if you use WhatsApp integration), or respond to a Google My Business chat. You can also send internal notifications to your team (for example, email/SMS/Slack alerts to the assigned user or a specific team member), or create a Manual Action to prompt a human follow-up (like queueing a task for a staff member to call the lead). These actions cover all the typical communication methods – both customer-facing and internal.
- Send email ( Send an email to the contact )
- Send SMS ( Sends a text message to the contact )
- Slack ( Get notifications in Slack )
- Call ( If the contact has been assigned to a user, this event will call the user and play the whisper message. If the person who answers the call presses any number key during the call, we will dial the Contact and if they answer, we will bridge the call. )
- Voicemail ( Pushes a pre-recorded voicemail file to the contact )
- Messenger ( Sends a Facebook Messenger message to the contact (contact needs to have previously messaged a connected Facebook page no more than 24 hours before arriving at this event in order for the message to successfully deliver)
- Instagram DM ( Sends an Instagram DM to the contact (contact needs to have previously messaged a connected Instagram page no more than 24 hours before arriving at this event in order for the message to successfully deliver).
- Manual Action To SMS ( Creates a Manual Action for someone to manually send an SMS to the contact (Manual Actions can be found in Conversations > Manual Actions)
- Manual Action To Call ( Creates a Manual Action for someone to manually call the contact (Manual Actions can be found in Conversations > Manual Actions)
- Send internal notification ( Send a notification to someone other than the contact )
- Send Review Request ( Send a Review Request to the contact )
- Conversation AI ( Configure the question and conditions for the bot exits and utilize the power of the conversation AI within your workflows )
- Facebook Interactive Messenger ( Facebook Comment On Post Or Customer Reply trigger should be present to use this action ) ( Sends a Facebook Messenger message to the contact (contact needs to have previously messaged a connected Facebook page no more than 24 hours before arriving at this event in order for the message to successfully deliver, this window does not apply to comment reply).
- Instagram Interactive Messenger ( Sends an Instagram message to the contact (contact needs to have previously messaged a connected Instagram page no more than 24 hours before arriving at this event in order for the message to successfully deliver, this window does not apply to comment reply)
- Reply In Comments ( This action is available only with FB/IG comment triggers. Using this action business pages can enable comment reply on any comment by a customer and/or like a comment. This action will not work for Facebook Groups. )
- WhatsApp: Customer Service Window Check ( When a WhatsApp user sends you a message, a 24-hour Customer Service Window is open, during which you can send unlimited free-form messages to the user without any restrictions. Each WhatsApp Business Account gets 1,000 free service conversations each month across all of its business phone numbers)
- WhatsApp: Send Flows ( Send WhatsApp Flows to your customers, allowing them to seamlessly book appointments directly on your existing calendars. )
- Send Live Chat Message ( Automatically send response message to the live chat )
- Appointment Booking Conversation AI Bot ( This workflow action to harness the power of AI and book appointments for you and your clients )
- Update Conversation AI Bot and Status ( Updates the Conversation AI bot and status for the contact )
- Book Appointment ( Automatically schedules appointments using standard or dynamic time slots, with the flexibility to override availability as needed. )
- Log External Call ( Add an external call to the conversation. If you are using Inbound Webhook Trigger to pass the call details )
- WhatsApp ( Sends a whatsapp message to the contact )
-
Appointment Actions: Manage your calendar bookings. For instance, update an appointment’s status (mark it as confirmed, canceled, no-show, etc.) automatically, or generate a one-time unique booking link that you can send to a contact (so they can schedule an appointment themselves via your calendar). This keeps your scheduling process smooth and automated.
- Update appointment status (This action changes the status of an Appointment. If the Contact was added to this Workflow via an appointment-related Trigger (“Appointment” or “Customer Book Appointment”), the status of the Appointment that fired the Trigger will be updated. If the Contact was added to this Workflow via another method, the status of the most recent Appointment that the Contact is carrying will be updated)
- Create Appointment Note (Create note for a calendar appointment)
- Generate One Time Booking Link (Generate one time booking link for a calendar)
-
Pipeline/Opportunity Actions: Automate your sales pipeline updates. You can create a new deal (Opportunity) in your pipeline when a trigger event happens (e.g., a new lead comes in), update or move an existing Opportunity to a different stage (e.g., move a deal to “Proposal Sent” stage automatically), or remove an Opportunity from the pipeline (e.g., if a lead is disqualified). This ensures your CRM pipeline is always up-to-date without manual data entry.
- Create/Update Opportunity (Creates or updates an Opportunity within the Pipeline that you select)
- Remove Opportunity ( Choose to either remove all opportunities for the contact in the pipeline, or remove only the opportunity that triggered the workflow or was found in the previous action.)
- Add Owner to Opportunity ( Assign a new owner to the opportunity. If contact and opportunity owners are synced, both will be updated; otherwise, only the opportunity owner will be updated.)
- Remove Owner from Opportunity (Removes any assigned users leaving the opportunity unassigned.)
- Add Follower(s) to Opportunity ( Adds the specified users as followers to the Opportunities. )
- Remove Follower(s) from Opportunity ( Removes all or the specified users as followers from the Opportunities.)
- Find Opportunity (Find an opportunity with matching values)
- Create Opportunity ( Creates a new opportunity using the fields below. If duplicate opportunities are disabled and an opportunity already exists in the same pipeline, the action will not execute.)
- Update opportunity ( If a ‘Find Opportunity’ action is present, it updates the matching record. Otherwise, it updates the opportunity triggering the workflow. If neither is found, nothing happens.)
-
Payment & Document Actions: Streamline your billing and paperwork. For example, charge a customer’s saved card via Stripe for a one-time payment (useful for one-click upsells or post-call deposits), send an invoice to a contact (perhaps right after they submit an order or as a payment reminder), or send out a contract/document for e-signature from within the workflow. This can greatly speed up your sales and onboarding operations by automating the payment collection and agreement process.
- Stripe one time charge (Trigger a charge in Stripe for a fixed amount to a specific customer in your Stripe account)
- Send Invoice ( Automatically send invoice using invoice templates )
- Send Estimate ( Automatically send estimate using estimate templates )
- Send Documents & Contracts ( Automatically send documents & contracts templates )
-
Advertising & Integration Actions: Connect Go High Level with other platforms in your marketing stack. For example, you can automatically add a contact to a Facebook Custom Audience (or remove them), which syncs with your Facebook Ads targeting (great for retargeting or exclusion). Similarly, add them to a Google Ads customer list or send a conversion event to Google Analytics or Facebook’s Conversion API (to track actions like “lead” or “purchase”). You can also send out data via Webhook to any external system (this is how you integrate with third-party apps or Zapier/Make), or add a row to a Google Sheet to log info in a spreadsheet. These actions ensure your other tools know what’s happening in HighLevel.
- Add to Google Analytics (Fire an event in Google Analytics)
- Add to Google Ads (Fire a conversion event in Google Ads)
- Facebook – Add to custom audience (Add contact to a custom audience in Facebook)
- Facebook – Remove from custom audience (Remove contact from a custom audience in Facebook)
- Facebook – Conversion API (The Conversions API allows advertisers to send web events from their servers directly to Facebook)
- Webhook (Fire a webhook containing the contact’s details)
- Custom Webhook ( Fire a fully customizable webhook containing any desired details)
- Google Sheets (Send data to Google Sheets)
-
Workflow Logic Actions: Control the automation’s path and timing. You can branch with If/Else conditions to handle different scenarios (e.g., if user filled out Form A vs Form B, or if a contact has a certain tag, take different paths), add Wait delays to pause the workflow for a certain duration or until a specific time/day, use Go To to jump to another step or even into another workflow (helpful to reuse common sequences or end a workflow by handing off to another), Remove from Workflow to pull the contact out of the current (or another) workflow when appropriate (e.g., they converted or moved to a different campaign), set a Goal event that the workflow watches for (if the contact achieves the goal, you can skip certain steps or end the workflow early – ensuring you don’t keep sending irrelevant messages once the goal is met), or perform a Split Test to randomly send contacts down different paths (useful for A/B testing different messages or timing). You can even enable Drip Mode to throttle how many contacts proceed at once in large campaigns (for example, process 10 contacts per hour instead of all at once, to avoid overwhelm or control send rates).
- If / Else (Fork the Contact journey through this workflow based on conditions)
- Wait (Holds a Contact for a specific time, until a condition exists, or until the Contact replies)
- Goal Event (When a contact meets the conditions of a Goal Event, they’ll jump straight to the Goal (regardless of where they were in the workflow) and continue from the Goal Event )
- Split (Split your contacts randomly (Just like ‘Rolling a Dice’ is random) into multiple routes based on the percentage entered against each path, helps to test out which path performs better.)
- Update Custom Value (Update a Custom Value)
- Go To (Go To enables you to take your Contact to other branch or step.)
- Date/Time Formatter (The Date/Time Formatter action is a versatile tool that allows users to reformat date or date and time structures and compare dates within workflows. This feature enables easy conversion of date formats for compatibility with different applications, database storage, or communication channels like email, SMS, or Slack. It also facilitates the comparison of dates to calculate the difference in days, simplifying date-related calculations and decision-making.)
- Number Formatter (An incredibly useful tool that allows you to format and manipulate numbers according to your specific requirements. This action allows you to convert, reformat, or generate numbers in various formats.)
- Math Operation (Add Math Operations)
- Set Event Start Date (Use this event to set the Event Start Date to a specific day, date, and/or time, which enables you to use Wait events that hold contacts in relation to the day/date/time that you set.)
- Add To Workflow (Adds the Contact to another workflow)
- Remove From Workflow (Removes the Contact from a specific workflow)
- Array Functions (Array Function action provide methods to handle with lists from multiple places)
- Drip (Proceed to next step in batches, at regular interval.)
- Text Formatter (Format your text data to capitalize, find & replace, trim and much more)
- Custom Code ( Write and execute code in your workflow. You can extend workflow functionality within and outside of the software with custom code action.)
-
Advanced & AI Actions: These let you leverage advanced tools or artificial intelligence. For instance, use Custom Code to run a custom JavaScript snippet if you need something beyond the built-in actions (this is for developers or very advanced users – most people won’t need to use this, but it’s there). You can also use AI-driven actions – Go High Level has a built-in integration with OpenAI (GPT-4) that allows a workflow to generate AI-written content. For example, you could have the AI draft a personalized email reply or SMS based on information you provide in a prompt. Additionally, HighLevel offers AI chatbot capability (such as an AI that can engage leads in a text conversation and book appointments – an add-on service known as Eliza). If you’re using HighLevel’s membership or course features, there are also actions to grant or revoke course access or community group access automatically when someone purchases or cancels. In short, the platform even supports cutting-edge automation like AI content and chatbots, as well as automating your online course enrollments.
- GPT powered by OpenAI (Send a prompt to GPT and get a response)
- Eliza AI Appointment Booking ( Add contact to AI Bot flow for appointment booking. The bot will converse with user and try to book the appointment on the selected calendar )
- Send to Eliza Agent Platform ( Once this action is configured, all the contacts will be delivered to Eliza for conversation. )
Most of your day-to-day workflows will use a subset of these actions (for example: send emails or texts, add tags, wait some time, maybe an if/else branch). But it’s good to know you have a wide range of actions available. Whatever repetitive task you’re looking to automate, chances are there’s an action in Go High Level to do it!
Best Practices for Effective Automation
Setting up workflows is powerful, but to get the best results (and avoid headaches), keep these best practices in mind:
-
Plan Your Workflow Logic First: Before you even open the builder, take a moment to outline what you want to happen. Identify the trigger event, the sequence of actions, and any branching conditions on paper or a whiteboard. This will help you catch logical issues before they happen and give you a clear roadmap to follow in the builder.
-
Name Workflows Clearly: Give each workflow a descriptive name that makes its purpose obvious at a glance (e.g., “Website Lead – 7-Day Nurture Sequence” or “Client Onboarding – Welcome Emails”). Clear naming conventions will help you and your team stay organized, especially as the number of workflows grows over time.
-
Start Simple & Use Templates: If you’re a beginner, start with a basic workflow or use the pre-built recipe templates HighLevel provides. It’s better to get a simple automation up and running (and learn from it) than to build an overly complex one right away. You can always expand or refine your workflows. Using templates can jump-start the process and ensure you cover common steps.
-
Use Filters and Conditions Wisely: Make sure your triggers have filters (when appropriate) to avoid pulling in contacts who don’t fit the scenario. Similarly, use If/Else conditions to split paths only when necessary. Try not to create an overly complicated spiderweb of conditions in one workflow – if it starts getting too complex, consider breaking it into multiple workflows for clarity. Simpler logic is easier to troubleshoot and less prone to unexpected issues.
-
Avoid Duplicating Messages: Be mindful that the same contact might end up in multiple workflows. Plan your automations so that people aren’t bombarded with redundant communications. For example, if you have two workflows that both trigger on “Contact Created” (perhaps for different purposes), a new contact could enter both – leading to overlapping messages. You can prevent this by using conditions or the “Remove from Workflow” action (e.g., when a contact enters one workflow, remove them from the other). The goal is to coordinate your campaigns so they complement each other, not conflict.
-
Timing is Everything: Pay attention to the timing and frequency of your automated messages. Use appropriate Wait steps to space out emails or texts – you don’t want to send five messages all at once. Also consider what time of day messages go out; HighLevel allows you to specify local sending times or days (in the workflow settings) to avoid odd hours. A well-timed message feels helpful, whereas a poorly timed one (like a 3 AM text) can annoy.
-
Test, Test, Test: Always test your workflows (using test contacts or dummy data) before letting real leads experience them. HighLevel’s Test Workflow feature and the workflow History log are extremely useful for this. Run through the entire workflow as if you were the contact – did you receive the emails or texts as expected? Did the logic branch correctly? Catch and fix any errors now. It’s much easier to adjust an automation before real people are in it.
-
Monitor and Tweak: Once a workflow is active, keep an eye on it, especially at the beginning. Check the workflow’s History to see that people are moving through the steps correctly. Look at your email open/click rates or SMS replies – are people engaging? If you notice drop-offs or low engagement at a certain step, you might tweak the content or timing. Treat workflows as living processes; optimize them over time for better results.
-
Keep Automations Human: Just because something is automated doesn’t mean it has to feel robotic. Write your emails and texts in a warm, personal tone as if you were sending them one-by-one. Use personalization (insert the contact’s name, etc.) where appropriate. And consider sprinkling in a personal touch – for example, an automated email might say, “Just reply to this email if you have any questions – I’m here and happy to help,” inviting a real human conversation. Automation should enhance relationships, not replace them.
-
Stay Compliant: Ensure your automations adhere to communication laws and best practices. For emails, that means including unsubscribe links and honoring them. For SMS, ensure you have the contact’s consent to text and include instructions to opt-out (e.g., “Reply STOP to unsubscribe”) where appropriate. Go High Level has features like DND (Do Not Disturb) and unsubscribe triggers – use them. Not only is this legally important, but it builds trust with your audience.
-
One Workflow, One Goal: It’s often wise to focus each workflow on a clear objective or outcome. For example, one workflow might be purely for “Convert Lead to Appointment,” while another is for “Onboard New Client.” This keeps them purpose-driven. If you find yourself cramming multiple goals into one massive workflow, consider splitting it up. Smaller, goal-focused workflows are easier to manage and optimize. You can always link workflows together (using triggers or the “Go To” action) if needed, without having one giant flow that tries to do everything.
By following these practices, you’ll create automations that are efficient, effective, and user-friendly – for both your team and your contacts. The goal is to let the technology handle the busywork while still providing a great experience for your leads and customers.
Conclusion & Next Steps
Workflows and automations in Go High Level let you work smarter, not harder. They ensure every lead is followed up and every client gets attention, without things slipping through the cracks. If all this feels like a lot, start small. Set up one simple workflow (say, a welcome email to new contacts) and see how it helps. Then gradually build more complex automations that run bigger parts of your business on autopilot.
Go High Level is built for marketers and small businesses, so the tools are accessible and focused on results (more conversions, less busywork, happier customers). Give it a try and experiment with your own workflows. Before long, you’ll wonder how you managed without automations!
Start your 30-day free trial of Go High Level here and put these workflow and automation features to the test in your own business. You might be surprised at how much time you save and how much more you can accomplish when your software handles the busywork. Happy automating!